| Index Creator Manual | ||||
| Index Print | Refresh Button | Pattern Selection | Index V Card | |
| ------------------ | ------------------- | -------------------- | ------------------ | ------------------ |
| Cover Creator Manual | ||||
| Top Font | Lines | Add Picture | Remove Picture | |
| Front-Back Cover | Adding A Frame | Adding Song Titles | Add Copyright | Quick Help |
| Saving Files | File Load Errors | Save Prompt Box | Enter Titles | Print Set-Up |
| Warranty, liability, legal notices. |
CD-R COVER CREATOR MAIN SCREEN
This is the first screen 'form' you see. It shows the program name, company name and has various push buttons that select which program you wish to run: The Index Creator, This Help File or the Custom Cover Creator.
There is also a CHECK box. If you put a CHECK in this box, when you RUN one of the programs by pressing a button THIS FORM will minimize to your task bar clearing the desk top. The program you select will then run. If you have any error message while running the programs then you should make sure the actual program or files are all in the main CREATOR directory. Files missing from this directory will often cause this problem. Also if you SAVE or LOAD files from another directory or drive the program may lose track of where this help file is located.
If you leave the Check Box UNCHECKED then THIS FORM will remain on the screen under the program you select to run.
The INDEX CREATOR is used for DATA CDs and will print the names of the folders or files found on that disk.
The CUSTOM COVER CREATOR is used to make CD covers with text, images, logos and song titles or a list of features found on custom software.
After you close either the INDEX or CUSTOM programs THIS FIRST SCREEN FORM will still be active so you can run the programs again or refer to the help file. If you are through using the COVER CREATOR programs, then close all forms down, including this one by pressing the "X" at the top right corner.
Go To Index
CD-R JEWEL BOX INDEX CREATOR
With this program you can either INDEX your CD-R or RW data disks showing the directories and file names contained within the specified directory and print this list out using any laser or ink jet printer in just seconds!

All you do is put a data compact disk into your CD ROM drive. Select the drive from the small list box at the bottom left of the program (most CD ROM drives are either D Drive or E Drive), then pick a display pattern to capture as much of your directory and file system as is possible in a single pass.
To change the display pattern simply select one of the radio buttons found at the far right of the form.
As you press these buttons the number and size of various directory and list boxes will change, sometimes adding a partial back page so you can make a V card. You can even turn your paper over and print more files on the back side making the V card contain even more file information! A scroll bar appears when more names are in a given directory than show on the screen. You can then use multiple directories and stagger the scroll bars so as many names as possible will show at one time. There are roughly 26 folder (directory) names or 31 file names in each column.
Go To Index |
 |
| 1 û Gives you one full directory and two full file list boxes. THIS IS THE ONLY OPTION THAT PRINTS FOR THE DEMO VERSION! | 2 - Shrinks the one directory to half size and adds another file box. Many disks contain only a few directories and many files. |
 |
 |
| 3 û Shrinks the directory down to just two folders û the root (drive letter) and top folder or any other single folder you select. You also get almost three full file list boxes. | 4 - This extends the form and prints a fold-over back side "V-card" format adding three more file list boxes (two folders and almost six file list boxes). |
 |
 |
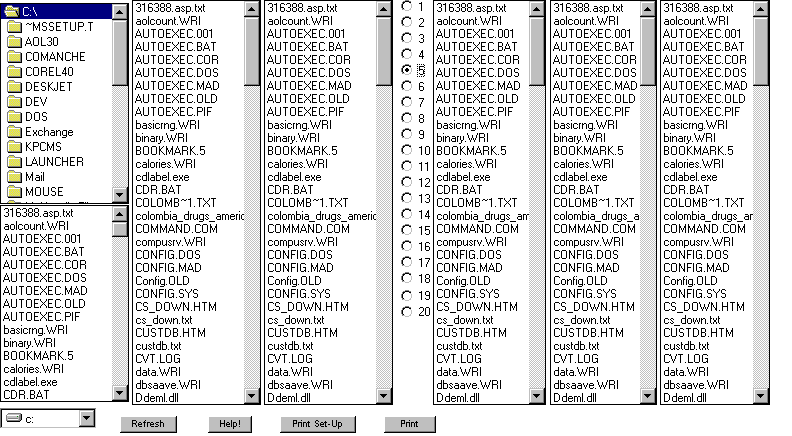
5 û Extends the far left directory to half size and shrinks the far left file box to half size. This gives ╜ directory and 5 ╜ file list boxes. |
6 û Gives one full directory and 5 full file list boxes. All files are linked to the far left directory, so as you click on a file folder the contents of all 5 file lists will change. Use the scroll bars to adjust these to display as many unique file names as possible. |
 |
 |
7 û Two full directories and 4 full files all linked to the far left directory. |
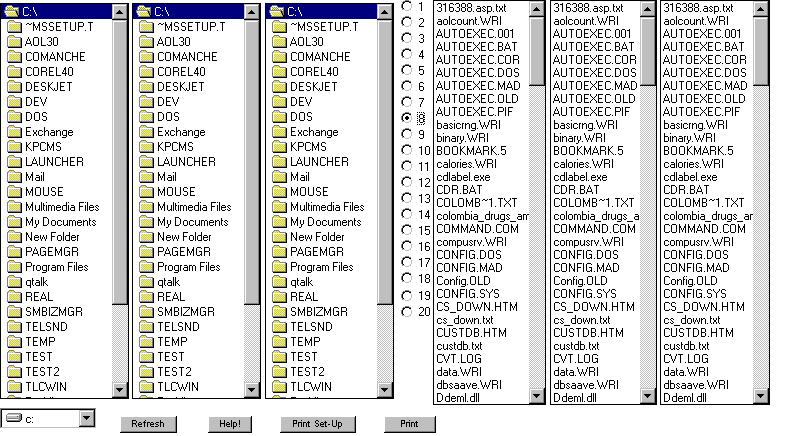
8 û Three directories and three files all linked left. |
 |
 |
9 - Four directories and two files all linked left. |
10 û Five directories and one file list all linked to the far left directory box. |
 |
 |
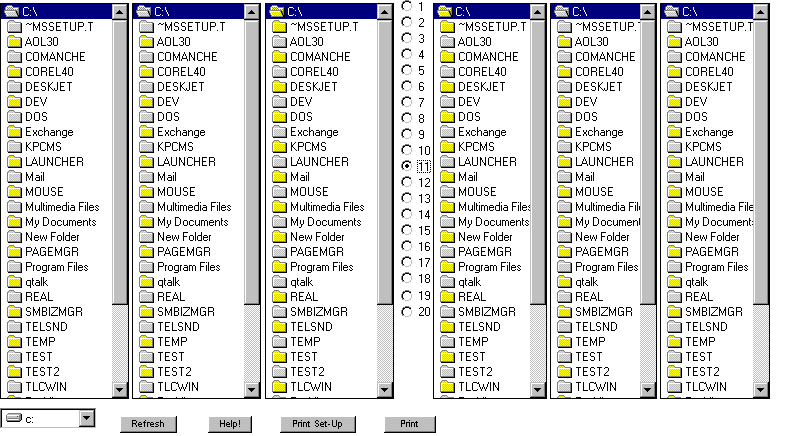
11 û Six directories and no file list boxes. All are linked to the far left directory. Giving a total of about 150 directory fold names on front and backsides combined. |
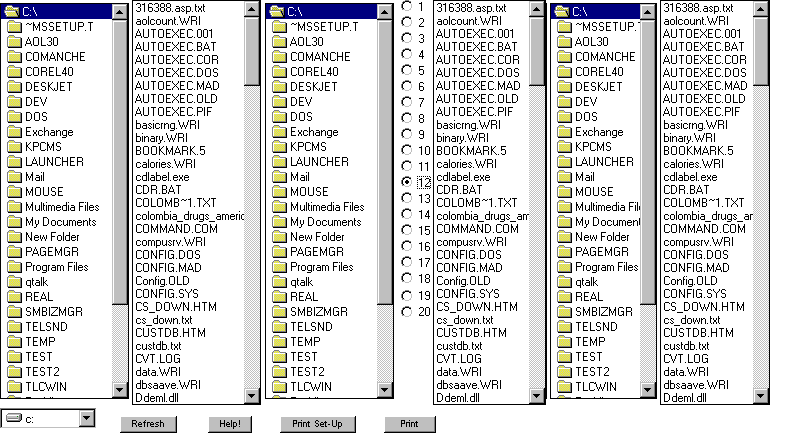
12 - Three directories and three file lists in a "checkerboard" style were one column is a directory and the next is a file list. Then comes another directory and another file list. These are NOT LINKED so you can select three different directory folders and display the information found in these folders. |
 |
 |
13 - Six directory (folder) list boxes and NO file list boxes. Essentially the same as button 11 EXCEPT this are not linked to the far left directory so you can display the sub-directory folders of different main directories but no files will show (you can always put them on the backside of the page). |
14 û Three directories with no back side NOT LINKED to the far left. Essentially this is half size of button 13. |
 |
 |
15 - Three directories with no back side or file lists, LINKED to the far left, so it will display about 75 unique directory folder names on the front cover. |
16 û Two directories with one file linked to the left directory box. |
 |
 |
17 - Three file list boxes with NO directory linked to the far left previously selected directory. With this you can print only files names or make a back side of just file names. |
18 - One directory and One file with a big blank space on the page for small jobs. |
 |
 |
19 û Half a directory and half a file list box for very small jobs. Big blank space you can write into if you add more files in the future. |
20 û Half a directory. A big blank space you can write into if you add more files in the future. |
Go To Index
NOTE! The DEMO only prints selection #1! Adjust you printer options as required. UPGRADE AND PRINT ALL FORMATS!
This program was designed to make quick, economical print-outs. A page of regular US paper (8 ╜ by 11") will never render a full V-card or multiple covers on a single sheet as CD Jewel cases are approximately 5 inches square so you have two options:
- You can print two slightly narrow covers economically by selecting PORTRAIT and printing one CD cover, then turning the paper around and printing ANOTHER cover on the lower half (some printers may crinkle you paper û that's the fault of printer not handling the curl generated by either the carbon imprint of laser images or the wetness of ink from a jet printer but more often than not this will print well in two passes). You can also flip the paper over and use the back side to add more files or directories from the same disk. They won't fold perfectly but they'll show as many directories and folders as we can pack in an economical format. And fast! As fast as your printer can print!
- You can also select LANDSCAPE and print ONE V-CARD that will fit perfectly from a single sheet of paper.
You can also chose to print in color (the folders come out yellow) or in gray scale on color ink jet printers by selecting any gray scale option button or box from your PRINTER OPTION form.
Ink jet images tend to printer cleaner than laser prints û laser printers sometimes tend to print dots in the directory or file box while most ink jet printers keep these areas pure white.
When you press the PRINT button to make your covers all the displayed push buttons vanish and don't print. Only the directory and file information prints.
The directory and file boxes are slightly different in size as the auto adjust to fit complete text information and the small yellow folders make the directory boxes a tad smaller than file list boxes. Also the folder icons lessen the amount of total directories as compared to files. You get about 31 file names per full column while only 26 directory folders. Smaller fonts don't read well (8 point fixed font is used to provide as many names as possible) also long file names are cut off due to column width. This is a trade off to generate more names and provide a program that doesn't require a lot of user work to size boxes.
With this program and even a slow system or printer it is possible to create 10 directory covers in about 15 minutes! All you then have to do is cut them to size. A paper trimmer works best. A single edge razor blade, box cutter or artist's knife with a straight edge ruler will make a clean cut. Scissors won't cut as straight but they will do an adequate job.
Go To IndexAfter you switch CD disks to make your second and subsequent covers pressing the REFRESH button will update the directory. IF A CD-R is BLANK or NOT READABLE you will get an error message and the directory will default to the C DRIVE. Try another disk and RE-SET the drive list box as required.
Clicking the mouse button inside the large gray area of the scroll bar will move the bar down a whole group. The file or directory name at the bottom of the box to the left should be the same as the name on the top of the box to the immediate right. You can then click on the arrow button at the very bottom right to move this down one line and get as many file names as possible into the cover.
Go To IndexIf you fold the V-CARD right at the SECOND PAGE column it should fit fully across the front of the Jewel case. In portrait mode the folded inside cover will be a short. If you want a complete inside V you must select LANDSCAPE mode and use one sheet for each card. You will also need to trim the far right side to print.
Ink jet printers have more "bleed" on the edges than laser jet printers so centering of the boxes will vary (generally laser printers need ╜ inch at the top and left side while Ink printers need closer to ╛" grab and bleed area).
This program is designed to render you a fast, economical and efficient way to printer covers of your home made DATA CD's so you will always know what's on a given disk.
The MUSIC and SOFTWARE CD Cover Maker is designed to provide a more commercial and aesthetic looking cover with less information. This cover allows you to place a graphic image. Size that image. Add fancy short titles in different fonts and colors. Put a band or author name. The optional back side is designed to provide a few lines for song titles or special information about your program.
This cover is designed to tell less about what's inside but make it look better so people can display it. It's designed to sell software and music with simple words or images.
Go To Index
CD JEWEL CASE COVER CREATOR
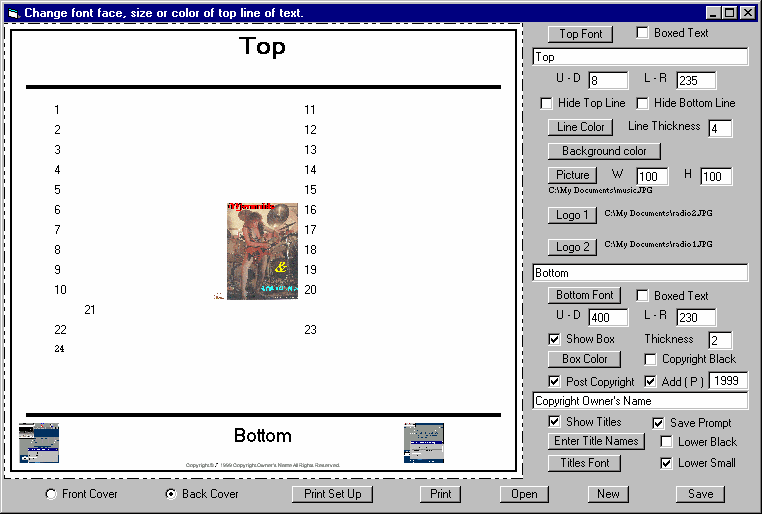
The Main Design Form Layout
Using PUSH BUTTONS, CHECK BOXES and DATA INPUT TEXT BOXES the Creator allows you to make a custom cover for the front, inside or back side of a standard CD Jewel Case including a picture image that can be sized from very small (as in the above example) or cover the entire form.

There are two headline-sized lines of title text. One on TOP and another on the BOTTOM for the title of your album, software or disk, plus a second name for an artist (or a two line title). These lines can be moved up and down and side to side by changing the values inside the boxes labeled U û D (Up and Down) and L û R (Left to Right). There are a set of these adjustments for both lines. If the Center box is checked the TEXT centers automatically as you enter letters or edit the line, so if you want to place the text off to one side this must be done manually by first REMOVING the check mark from the Center box and then changing the position in the L û R window (a lower number moves left and a higher number moves to the right). These positions are in pixels. You can also change the FONT FACE to any supported font on your system (note an error and program crash WILL occur if the font specified does not exist when the file is re-loaded), the size of the font in points and the color of the font. Font effects BOLD, ITALICS, STRIKE THROUGH and UNDERLINE are supported for both TOP and BOTTOM headline text. Finally if you want you can enclose either of these lines of text inside a black outline. The color of this outline always stays black and works best with bright or white backgrounds. If you do not want one or both of these lines of text, just leave them blank. Neither the picture image nor background color is affected by a blank line.

There are two thick lines, one below the default starting place for the TOP line of text and another above the default starting point for the BOTTOM line of text. You can change the thickness of these lines by increasing the value of the number next to LINE THICKNESS or you can remove one or both lines independently. You can also change the color of the lines by pressing the button marked LINE COLOR. If you leave the thickness boxes blank the line automatically reverts to 1 pixel as a minimum. We left these lines ON to give you a starting point in cover design. You can turn one or both of the lines off. They are, however, fixed at these locations.

You can also make the background a variety of colors if you are using a color printer, press on the BACKGROUND COLOR button and make your selection. Remember, however, that adding color will use more ink, the cover will smear for a while until the ink dries or 'cures' and the printing process will be slower than with a white background. Also some low cost printers do not provide black ink with a color setting so anything black will come out dark gray or green. Deep colors like fire engine red tend to show printer flaws (streaks) which can only be corrected by using a top quality printer, with glossy paper and maximum print quality. None of these flaws are caused by this program. They are hardware flaws.
Go To IndexIf you want to add a picture of the band, artist or a graphic for your software, press the PICTURE button and select from any JPG, GIF or uncompressed Windows BMP file from any drive source. The picture will automatically stretch to fit the square default image size and will stay centered on the form at all times. You can then adjust either the Width or Height of the picture by changing the values in the W or H boxes. Not only can you correct for malformed images but you can also increase the image size to fit the whole page. A perfectly square image is required for a full front cover and a slightly wider image is needed for the backside 456 x 456 pixels and 456 x 519 respectively). The file path is shown below the button. The file must remain in this location when you recall the layout in the future. If you move any of the image files you will get a FILE LOAD ERROR MESSAGE and must browse and insert the file from the new location and save the work a second time! When using this program between machines on a local network first SELECT 'Network Neighborhood' from the file selector list of drive options, then find the NETWORK NAME OF YOUR COMPUTER from the paths shown or click on the FILE SERVER COMPUTER holding the picture images. Then search for the picture you want to use. This way the file path will include the MACHINE NAME as part of the path name and thus ANY computer on your network should be able to use the layout files with no FILE LOAD ERRORS!

Go To Index
If you want to remove the current image press the CLR button next to the H window on the far right. A small form with check boxes will appear when you press the CLR button.
You can select one, two or all three images by clicking the appropriate check box for the picture or logo and putting a CHECK mark into the box, pressing the OK button when finished. If you change your mind, then just LEAVE THESE UNCHECKED and press OK. Once you remove a picture you must save the new file before the change is permanent.
You can also add two small (40 x 40 pixel) thumbnail sized pictures or logo images for your company. One can be added to either side on the bottom with the LOGO 1 and LOGO 2 buttons. See ADD PICTURE above for details on importing files from a local area network (LAN) system.
You can use either the Paint or Photo program which generally comes with Windows 95/98 (or any other third party paint program) to create, convert or modify most any graphic or image and turn them into either a GIF, JPG or UNCOMPRESSED BMP file format.
The paths for these two logo images are shown next to the buttons.
The next TEXT BOX is for the bottom line of text, which can be moved like the TOP line. You can even move this line up to the TOP so you have two lines of text. As with the top line the COLOR, FONT and FONT SIZE can be adjusted.
 Go To Index
You can also put a frame, square or (for the back side) rectangle around the outer edge of the form by putting a CHECK in SHOW BOX. This inner square can be made thicker by increasing the value of the THICKNESS box in pixels. You can also change the color of this inner square. White works best if you are sizing a picture across the full form.
Go To IndexIf you want to post a Copyright notice on the form, check the POST COPYRIGHT box and the CURRENT CLOCK YEAR (subject to your computer clock being current) will automatically appear. You can manually change this year to any other year you'd rather show. Also the words "All Rights Reserved" will be added providing you with extra protection under some treaties. The word "Copyright" and the circle 'C' symbol will also appear. You can enter the legal owner's name in the box below. If you CHECK the COPYRIGHT BLACK check box this notice will always be in black ink. If you leave this UNCHECKED it will take the color of the SONG TITLES (and not the larger headline titles). If you CHECK the ADD (P) check box the letter P enclosed in a circle will be added next to the C enclosed in a circle. NOTE! Windows system fonts do not currently support this text symbol so we created the Circle P as an image, so if you change font color or background color a small white square and black Circle P will be seen. Since the P must be enclosed in a full circle û using parenthesis, such as ( P ) is not generally acceptable to the United States û we opted to create a small bit map image of the circle P which cannot be changed in color or background. You add this symbol for musical CDs to protect the actual sound recording as required by treaty. The copyright notice moves up the page as you increase the thickness of the optional BOX.
 Go To Index
The SHOW TITLES CHECK BOX let you add up to 20 song titles or software features plus extra spaces for music publisher, players, programmer, producer or engineer credits. Finally there is a box to enter liner notes, players, studio and other information. While this bottom most box expands on the actual printed cover image, in the ENTER TILES form you must put the cursor inside the very bottom line and then use the arrow keys to move left and right within the line of text. You have the option to keep this area at 6 point type (the LOWER SMALL check box ) and in black ink (LOWER BACK check box
) or you can keep this at the same font size and color as the rest of the titles. The text just above this lower area (for the producers and publishers) will be slightly larger. The very bottom small text is a fixed font (Arial) but the rest of the titles (and producer credits) can be changed to another font face.
The publisher, producer and engineer credits will also stay at 10 point type or at the size of the other titles (which are 10 point at starting default but can go larger).
You can enter the titles and credit by pressing the ENTER TITLES push button. A new form will appear. By checking on the bottom CHECK BOX you can change the tab order from DOWN to ACROSS. When you press the ENTER or CARRIAGE RETURN key while typing the cursor will move down the column or across to the next adjacent box. You can either MINIMIZE this new box or CLOSE IT. When you open it again the names will still be in the text boxes for editing and changes. You may have to add spaces and use multiple lines to keep these titles neat on the form.
The TITLES FONT button lets you adjust the color, size and font face for the 20 titles, publisher and producer credits. You can leave the producer and publisher credit size small and the color black, while changing the size of these items. But remember the bottom-most group of text will always stay in the fixed font.
You also have an option to CENTER the very bottom paragraph of fine print (album credits, etc.) or leave it flush to the left with a jagged right edge (like a typewriter).
Because no two sets of "titles" on a CD will be the same, you will need to pad the various entries and change spacing or use multiple lines to see that all elements line up correctly. This is especially true when switching from a FRONT to BACK cover format.
Go To Index
Here you will notice a SAVE PROMPT check box. By default this program will generate an ALERT BOX and prevent you from CLOSING the program, OPENING a new file or starting a NEW layout giving you a second chance to SAVE the current layout. This is your last line of defense against putting time into a layout and forgetting to save it! If this feature annoys you, CHECK the box and NO PROMPT will be given (and you may lose a work in progress). Remember you must defeat this SAVE PROMPT each new time you run the program.
If you CHOSE the SAVE PROMPT option, you must check either YES or NO at the prompt. If you chose YES the program will automatically send you to the SAVE option so you can save this under the current name or give it a new name. If you say NO the action you requested (NEW, OPEN or EXIT) will happen. Because you may make a false start and the program doesn't know what is false or real, this feature can be an annoyance, hence we allow you to defeat it with this CHECK BOX.
At the far left bottom are two RADIO BUTTONS to change the width of the form (and centering) for the rear (back) side of the jewel case (which is wider than the hinged front flap) or the front side (front and inside on the back of the flap are the same size). A CUT box is proved. You can cut inside this box, on the line or outside the line. All three cuts will generally fit the case. Leaving the lines in place can be an additionally decorative feature. Cutting ON the line works well with scissors.
Next are five PUSH BUTTONS.
Go To IndexPRINT SET-UP lets you change from portrait to landscape mode (generally this is not required to make a good cover, but if you want a V FOLD cover the landscape setting will provide this extra wide size on standard paper sizes). You can also adjust the number of prints, the print quality (some color printers lets your print in black and white using GRAY SCALE). Printer settings ARE NOT SAVED and you must set these up each new time you run the program.
The PRINT button prints the finished, selected size cover ONLY of the MYDEMO.JCC file.
OPEN lets you open a previously saved layout. All image files must remain in their original location or an ERROR message will be generated. Titles will generally import into the pixel positions specified when you saved the original file. Remember, if you make a change the new text will automatically center on the form!
NEW re-sets the form to default settings so you can make a fresh layout.
SAVE lets you save a new or edited layout to disk. It generally saves (or opens) from the last file location you used when working your computer. You can change the path in the usual manner and save your files in the program directory or any other location you desire.
Go To Index
When you move the mouse pointer over any label or control a quick reference HELP notice will show on the top bar of the program telling you basically what the control will do.
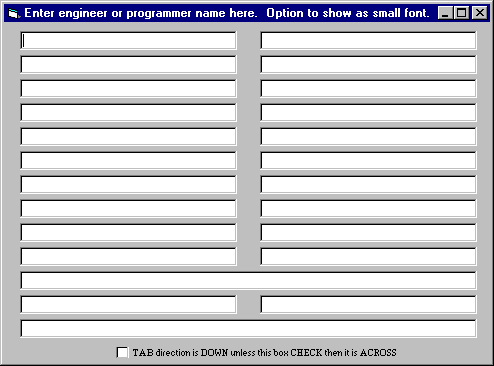
The Form Used To ENTER Song Titles
The "down" tab format goes 1, 2, 3, 4, 5, 6, 7, 8, 9, 10, 11, 12, 13, 14, 15, 16, 17, 18, 19, 20, 21, 22, 23, 24.
The "across" tab format goes 1, 11, 2, 12, 3, 13, 4, 14, 5, 15, 6, 16, 7, 17, 8, 18, 9, 19, 10, 20, 21, 22, 23, 24.
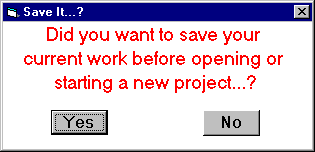
The SAVE IT alert box you will see if the SAVED PROMPT check box is checked.
This box is generated when you press NEW, OPEN or the CLOSE button (top right "x" box on the form), without first SAVING your work.
When this box comes up you either press YES (if you want to save your work) or NO (you don't want to save the work). Once you SAVE your work this PROMPT no longer appears.
If you press NO the function you requested (OPEN, NEW or EXIT) will occur.
If you don't want this prompt feature then UN-CHECK the SAVE PROMPT check box, but be advised you can lose a layout if you don't remember to save it!
Go To Index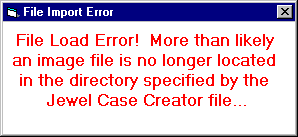
The alert box you may see if you move a file from the original location.
The rest of the file will generally load, but line spacing may need some manual correction and you will need to locate and import the image files again, then re-save the document. Or you must find the files and move them back to the original location and then call this layout back into the program.
Just click on the CLOSE button (the small X at the upper right) to get rid of this or any alert form.

The Form You See When You Want To Clear An Image
Just put a check mark in one or more of the items and press OK to remove the main picture or small logos from the current cover.
If you did this in error, just leave all three box UN-CHECKED and press OK to close the form without hurting your layout.
If you decide AFTER removing a picture to restore it and HAVE NOT YET SAVED this new file, then simply press OPEN and call the original file back in to the program OR find the picture on your computer and insert it back into the layout.
Go To IndexWhen you press the SAVE button after starting a NEW project the default file name of mydemo.jcc will be used IN THIS DEMO VERSION ONLY. You must either keep this name (and overwrite the existing file) or UPGRADE to the FULL VERSION to SAVE AS another name (note, SAVE will continue using the name MYDEMO.JCC for any file of any name you open).
Several copyrighted sample layouts are provided to show you the possibilities!
Go To IndexNote: All 'Cover Creator' programs and related files, including images and the manual are Copyright 2000 All Rights Reserved. Images are included solely for example or demonstration purposes and are not intended to be used for any other commercial purpose other than as a demonstration with this program. This program is licensed to the person or firm named in the registration certificate or shown on the invoice under which you obtain this program and the license to use it. Under the terms of this license you can not distribute copies of this program to other persons or firms unless you are licensed as an authorized distributor of this program. You can not place this program on the Internet nor on any BBS or similar FTP or computer or file server that is available to the general public. By accepting and using this program you acknowledge that the extent of our liability is limited to replacing any defective program, disk or manual with one in reasonable operating condition or if all other remedies fail to refund the purchase price for legally registered copies or those copies having valid invoice or receipt, within 90 days from the date of purchase. No other warranty is expressed or implied including, but not limited to, fitness for use. If you cannot accept these terms and our limits of liability do not use this product and return it to where you bought it for a refund.
If you like this program, are happy with the results you get using the demo and would like to pay for an upgrade to the full version with no disabled functions you can do this ON-LINE at GETSOFTWARE using most major credit cards.
The price for an ELECTRONIC DOWNLOAD of the full version is $15.00 in U.S. Funds.
If you would like both an ELECTRONIC DOWNLOAD and a copy of just the upgrade files on 3.5" floppy disk the price is $18.00.
You can also purchase the ENTIRE program (including all support files) on CD-R (gold or green disk -- your computer MUST have a CD ROM that accepts ALL MEDIA TYPES to use these CD-R disks) in a jewel case for $20.00 U.S.
OR you can send a check or money order DRAWN ON A U.S. BANK (International Postal Money Order or U.S. Checking account) payble to: Earl R. Dingman, PO Box 39A16, Los Angeles, CA 90039 USA.
If you ARE ON LINE RIGHT NOW, you can click the link below and go DIRECTLY to the Get Soft Download Center (URL is http://www.getsoftware.com/) To Register:
Get the Virtual UPGRADE! ($15)
Get the Virtual UPGRADE plus a 3.5" Floppy! ($18)
Get the Virtual UPGRADE plus the CD-R Disk! ($20)